Using imgui
XPPython3 supports imgui (“Immediate Mode GUI”), the Dear IMGUI library, which is wrapped by the pyimgui module 1.
If you’re not familiar with imgui, read about the C++ library, and the python module using the links above.
Note
To support XPPython3 and X-Plane, we’ve had to make small modifications to the python imgui wrapper and have included this code as part of standard XPPython3 installation in XPPython3/imgui folder.
Installation
Our version of imgui requires OpenGL, so everyone (you and all users of your plugin) will need to install OpenGL. See Using OpenGL for details.
There is nothing else you need to install.
Test Plugin
We include a sample plugin which uses imgui: PI_imgui.py, which can be found under PythonPlugins/samples/. (Samples and Demos)
Copy that file
into PythonPlugins/ and restart X-Plane. You’ll see a new menu item under Plugins, and each time you select it, we’ll
display another copy of the popup window.
Using imgui in your plugin
Create an imgui window
add imgui code to the draw callback
imgui works within a window. To create an imgui-capable window, we provide:
instance = xp_imgui.Window(...)
xp_imgui.Window() takes the same parameters as xp.createWindowEx(), but returns an instance rather
than a simple windowID. You can call this in response to a command or menu selection in
your plugin code.
The biggest difference is that the draw()
callback you provide with window creation will contain imgui calls.
We’ll setup the context prior to calling your draw callback, so you can be focussed on just your implementation-specific code, which could be as simple as:
>>> def drawWindow(windowID, refCon):
...     imgui.button("Click me")
...
This is because xp_imgui interface code handles imgui-specific setup and rendering for you, so you don’t have to:
imgui.set_current_context()
imgui.set_new_frame()
imgui.begin()
# -----
#  your drawWindow() code is executed here
# -----
imgui.end()
imgui.render()
render.imgui.get_draw_data()
The underlying windowID can be found as an attribute of the returned instance. This allows you
to do things to the window such as xp.setWindowIsVisible(), xp.setWindowPositioningMode()
and other operations as described in XPLMDisplay.
>>> xp.setWindowPositioningMode(instance.windowID, 4)
Imports
To use imgui, you’ll need to add two imports:
from XPPython3 import imgui
from XPPython3 import xp_imgui
The first import provides imgui drawing routines. You need to use this version of imgui. Importing it in this fashion from XPPython3 will guard against possibly loading one from the python site-libraries.
The second import provides an X-Plane compatible interface by creating a window into which you will be able to draw.
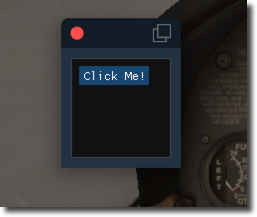
Simple Example
You can copy & paste this directly into the python debugger:
>>> from XPPython3 import xp_imgui
>>> from XPPython3 import imgui
>>> def drawWindow(windowID, refCon):
...     imgui.button(refCon)
...
>>> window = xp_imgui.Window(draw=drawWindow, refCon="Click Me!")
>>> xp.setWindowIsVisible(window.windowID)
Longer Example (PI_imgui.py)
This example is available under Samples and Demos, and listed here simply for reference.
from XPPython3 import xp
from XPPython3 import xp_imgui
from XPPython3 import imgui
class PythonInterface:
def __init__(self):
self.windowNumber = 0 # Number we increment, just to "know" which window just created
self.imgui_windows = {} # {'xp_imgui.Window' instances}
self.cmd = None
self.cmdRef = []
def XPluginStart(self):
# Create command and attach to Menu, to create a new IMGUI window
cmdName = "xpppython3/pi_imgui/createWindow"
self.cmd = xp.createCommand(cmdName, "Create IMGUI window")
xp.registerCommandHandler(self.cmd, self.commandHandler, 1, self.cmdRef)
xp.appendMenuItemWithCommand(xp.findPluginsMenu(), 'IMGUI Window', self.cmd)
return 'PI_imgui', 'xppython3.imgui_test', 'Simple IMGUI test plugin'
def XPluginEnable(self):
return 1
def XPluginStop(self):
# unregister command and clean up menu
xp.unregisterCommandHandler(self.cmd, self.commandHandler, 1, self.cmdRef)
xp.clearAllMenuItems(xp.findPluginsMenu())
def XPluginDisable(self):
# delete any imgui_windows, clear the structure
for x in list(self.imgui_windows):
self.imgui_windows[x]['instance'].delete()
del self.imgui_windows[x]
def commandHandler(self, cmdRef, phase, refCon):
if phase == xp.CommandBegin:
# For fun, we'll create a NEW window each time the command is invoked.
self.createWindow('PI_imgui Window #{}'.format(self.windowNumber))
self.windowNumber += 1
return 1
def createWindow(self, title):
# Update my imgui_windows dict with information about the new window, including (for
# demo purposes) stored values of the various widgets.
#
# The only thing we really need is a unique reference constant, which
# we pass into as part of initialization of the xp_imgui.Window() class
#
# In this example, we'll use this local data as the reference constant.
self.imgui_windows[title] = {'instance': None,
'title': title,
'numButtonPressed': 0,
'checkbox1': False,
'checkbox2': True,
'radio': 1,
'slider': 4.75,
'text': 'type here'}
# Determine where you want the window placed. Note these
# windows are placed relative the global screen (composite
# of all your monitors) rather than the single 'main' screen.
l, t, r, b = xp.getScreenBoundsGlobal()
width = 600
height = 600
left_offset = 110
top_offset = 110
# Create the imgui Window, and save it.
self.imgui_windows[title].update({'instance': xp_imgui.Window(left=l + left_offset,
top=t - top_offset,
right=l + left_offset + width,
bottom=t - (top_offset + height),
visible=1,
draw=self.drawWindow,
refCon=self.imgui_windows[title])})
# and (optionally) set the title of the created window using .setTitle()
self.imgui_windows[title]['instance'].setTitle(title)
return
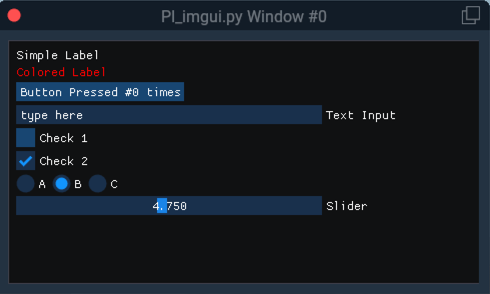
def drawWindow(self, windowID, refCon):
# LABEL
imgui.text("Simple Label")
# COLORED LABEL
imgui.text_colored(text="Colored Label", r=1.0, g=0.0, b=0.0, a=1.0)
# BUTTON
if imgui.button("Button Pressed #{} times".format(refCon['numButtonPressed'])):
# every time it's pressed, we increment it's label.
refCon['numButtonPressed'] += 1
# TEXT INPUT
changed, refCon['text'] = imgui.input_text("Text Input", refCon['text'], 50)
# CHECKBOX
changed, refCon['checkbox1'] = imgui.checkbox(label="Check 1", state=refCon['checkbox1'])
changed, refCon['checkbox2'] = imgui.checkbox(label="Check 2", state=refCon['checkbox2'])
# RADIO
if imgui.radio_button("A", refCon['radio'] == 0):
refCon['radio'] = 0
imgui.same_line()
if imgui.radio_button("B", refCon['radio'] == 1):
refCon['radio'] = 1
imgui.same_line()
if imgui.radio_button("C", refCon['radio'] == 2):
refCon['radio'] = 2
# SLIDER
changed, refCon['slider'] = imgui.slider_float("Slider", refCon['slider'], 0.0, 10.0)
return
The above is pretty basic: a menu item is created to call a command. Each time the command is called, we’ll create a new window and give that window the title “PI_imgui Window #<n>”.
Each window’s reference constant is a dictionary, which contains values for its widgets. In real life, this might point to datarefs to set or other internal data.
Note that drawWindow does the imgui work and everything else is nearly identical to
a non-imgui example.
More pyimgui and imgui
imgui is an open-source C++ library. As of August 2021, imgui is on version 1.83.
pyimgui is an open source python wrapper to some of the features of the C++ library. It wraps an older version of imgui, version 1.65. Development on this python interface seems to have stalled. (pyimgui is version 1.3.1, which generally supports imgui 1.65).
XPPython3 has taken a copy of pyimgui v1.3.1 and modified it to work with X-Plane, pyimgui (and XPPython3’s copy) includes imgui v1.65 C++ library.
So XPPython3 will support at best features from 1.65. This is more than adequate for implementing widgets to interact with the user: more complicated drawing is probably not going to work. Some of the features in the C++ library are not (yet) supported by pyimgui.
There are two ways to see what this version of imgui can do:
Modify the provided sample in PI_imgui.py, and run that within X-Plane
Run standalone pyglet based GUI, where you can try out the widgets without running all of X-Plane.
ShowDemoWindow
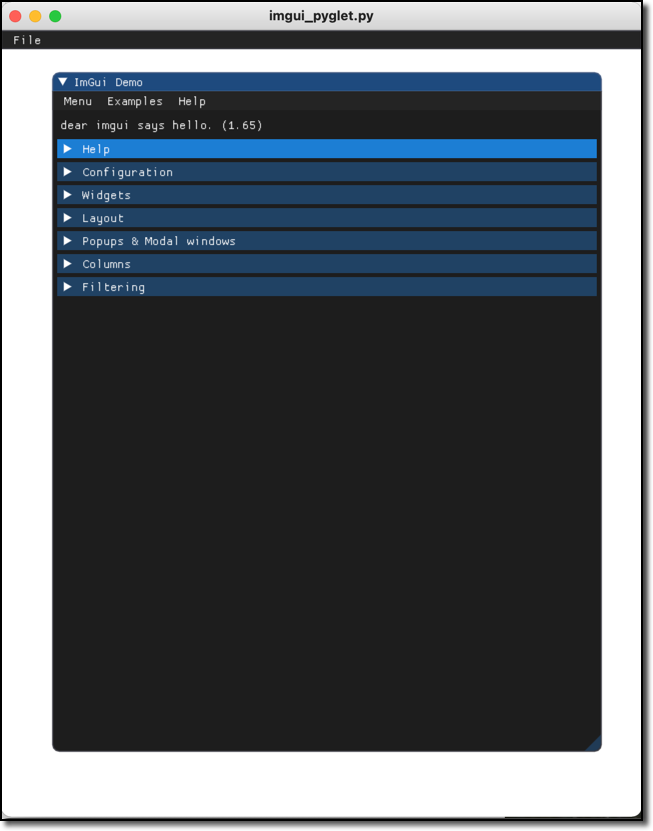
Either way, imgui comes with a great demonstration. In C++ it is ImGui::ShowDemoWindow().
You can see this by calling the pyimgui method show_demo_window(). Not very helpful actually,
because that python merely calls the C++ method.
However, we’ve also included the file pyimgui_demowindow.py under PythonPlugins/samples which
is work-in-progress rewriting the C++ method fully in python. Look at the python file to see
the actual set of pyimgui calls you can make (e.g., imgui.radio_button, imgui.slider_float).
refer to pyimgui’s documentation, especially
pyimgui.core.
- To run standalone, do this
Get python3 running
Install python modules
pyopengl,pyglet$ python3 -m pip install pyopengl pyglet
Run sample
imgui_piglet.py, picking up pyimgui fromResources/plugins/XPPython3:$ cd Resources/plugins/PythonPlugins/samples $ PYTHONPATH=<XP>/Resources/plugins/XPPython3 $ export PYTHONPATH $ python3 imgui_piglet.py
Advanced - imgui to X-Plane interface code
All of the xp / imgui interface is implemented in python code in the provided XPPython3/xp_imgui module. If
you’re curious how this works, check out files under XPPython3:
xp_imgui/window.py: which provides the window manipulation code, and
xp_imgui/xprenderer.py: which provides the interface between XPlane’s OpenGL and the imgui renderer
You should not have to modify either of these files! They are provides by XPPython3 and are automatically updated each time XPPython3 is updated (and your changes will be lost). If you see the need to make a modification, please contact me (support [at] xppython3.org) so I can make the improvement available to everyone.
- 1
Well, kind-of. The generally available pyimgui module has bugs making it incompatible with X-Plane. Fortunately, XPPython3 includes a copy.